Add Printer to personal Windows 7
The second way to add a printer still makes use of the Add Printer Wizard, but you will use a different option, and you must know the name of the printer you wish to use. Use this method if you are using a personal machine. This guide is for adding a printer in Microsoft Windows 7. For Windows XP, see here.
Step 1 - Starting the Add Printer Wizard
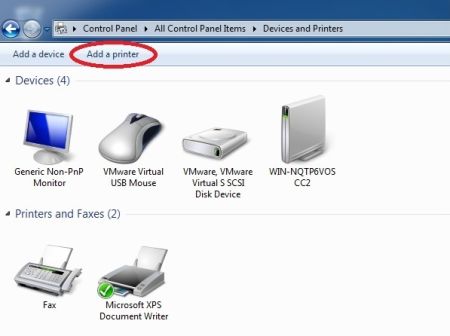
To start the Add Printer wizard, click on the Start button, then click on Control Panel. When the Control Panel Window Opens up, choose Devices and Printers. Once this opens, click on "Add a Printer" on the bar right below the address bar, as shown in Figure 1.
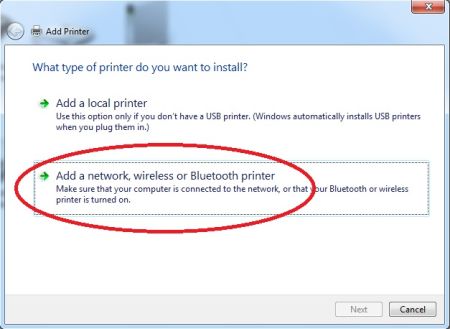
Choose the second option, "Add a network, wireless or Bluetooth printer", and hit NEXT to proceed to the next step. Figure 2 shows this step.
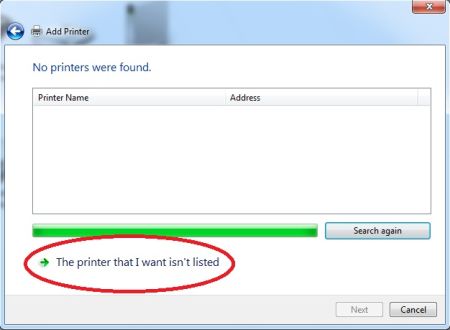
Ignore Windows attempt to search for network printers and select "The printer that I want isn't listed," as in Figure 3.
Step 2 - Enter in the Print Server and Printer Name
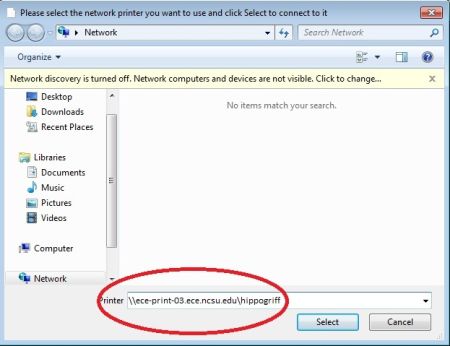
You should now be looking at a window titled "Find a printer by name or TCP/IP address." Immediately click the "Browse" button to reach the window shown in Figure 4 below. In this window, fill in the "Printer" blank with the print server and the name of the printer that you wish to use. The print server is eceprint.ece.ncsu.edu, and the name is the name of the printer. Fill in the blank in the following format:
\\eceprint.ece.ncsu.edu\<printer's name>
Figure 4 shows an example where we are connecting to the printer HIPPOGRIFF. As you can see, we have entered "\\eceprint.ece.ncsu.edu\hippogriff" in the blank. Once you have filled in the blank, click Select to return to the previous window. From there, click NEXT to proceed to the next step.
Step 3 - Authenticate to the Print Server
Your computer may take a moment to contact our print server, but eventually a login prompt should appear. You must authenticate with your WOLFTECH-domain login and password, which should be identical to your unityID and password. For questions about your WOLFTECH login and password, email ecehelp@ncsu.edu.
When entering your credentials, enter your username as wolftech\username. If you do not, your attempt to authenticate to the server will fail.
Figure 5 shows an example of the login prompt and how to enter your username and password. After you have entered your username and password, click OK and the computer will attempt to add the printer. In the case that the Add Printer Wizard doesn't prompt you to enter a password, don't worry, this just means that your password has already been stored, possibly from a previous printer addition.
At this point, a dialog box might pop-up such as in Figure 6. If this happens, it means that drivers need to be installed for the printer; However, all you need to do is simply click Install driver, then give Windows permission to do such at the next prompt.
If you are not prompted to install a driver then your computer is already equipped with the required drivers and you can proceed onto the next step in this guide.
Step 4 - Finish the Wizard
The next window that comes up will have the printer's name on it, and in some cases, the option to make it your default printer. Simply verify that the printer name shown is the one you want to add and hit NEXT.
Finally, you will be prompted to end the Printer Add Wizard. This window also gives you the option to print a test page to verify that the printer is working. If you wish to do so, click "Print Test Page", otherwise click FINISH.


