Xerox Printing Guide
Location and Access
MASTIFF is located in room 3006 EB2 and is currently restricted to ECE faculty, staff, and research assistants (RAs). For issues not covered by this document, see Brian Carty in 3218 EB2. If you need technical assistance with the printer, email ecehelp@ncsu.edu, or if an emergency, call the Wolftech workroom at 515-0124.
Physical access to MASTIFF is restricted to the hours of 8am - 5pm, Monday through Friday.
You can print to it outside of these hours, but you won't be able to pickup the document until the Student Services office reopens.
Adding the Printer
MASTIFF is available over the network via our domain print server. To add the copier/printer to your machine, please view the following pages:
- For Wolftech-domained machines, use "Add by Directory Search".
- For Ecew2k-domained machines or personal machines, use "Add by Print Server and queue".
Important Notes
- We strongly encourage you to make use of MASTIFF for print/copy jobs that exceed 35 total sheets.
- "Sheets" refers to a full sheet of paper. So 35 sheets could be a 35 page document, or 5 copies of a 7 page document.
- MASTIFF is black and white only.
- MASTIFF will automatically create a cover page for your job which shows the date and time of the print out and your username for easy identification.
- MASTIFF can also auto-collate and staple your document(s), as well as produce booklet-style printouts or multiple-pages-on-a-page for handouts.
- Currently the only paper size available is 8.5 x 11. To request additional paper options, please see Elaine Hardin in 3096 EB2.
Printing a Document
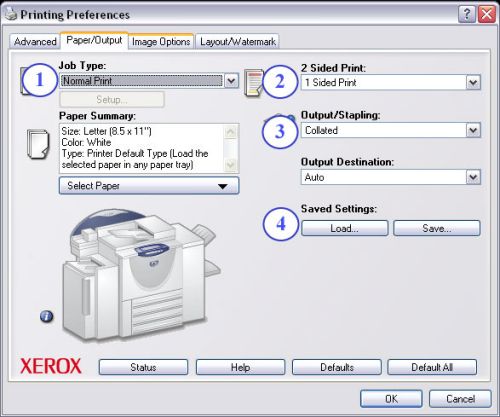
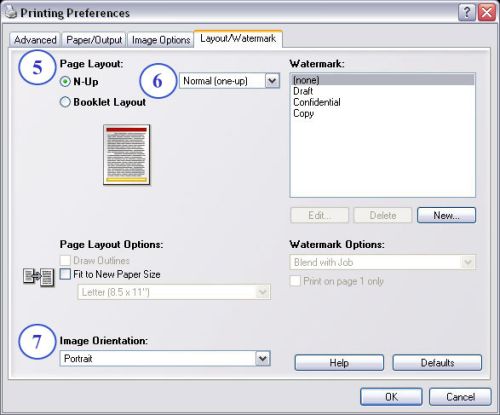
To print a job, open the print dialogue (CTRL + P or File -> Print) and select MASTIFF from your list of available printers. If you have not yet added the printer, see Adding the Printer above. Once you have selected the printer, click the "Properties" or "Preferences" button to reach the Printing Preferences window shown in the figures below. These two figures show the options necessary for most common print jobs. If you have questions about the more advanced options, please contact WolfTech for assistance.
1. Job type:
- Leave as default option of "Normal Print"
2. 2 sided print:
- Used to make job print on one or both sides of a sheet of paper
- Options are "1 sided print", "2 sided print", or "2 sided print, Flip on short edge"
- Default is "1 sided print"
3. Output/Stapling:
- Used to make copies output as automatically collated or stapled
- Options are "Uncollated", "Collated", "1 Staple", "2 Staples"
- Default is "Collated"
4. Saved Settings:
- Use to save or load pre-set configurations
- To Save: After changing options to desired settings, click Save, choose a name, then click OK.
- To Load: Click Load, choose the saved configuration you wish to use and click OK.
- Configurations are saved only in your profile on the specific machine you are using. They will not carry over to other machines.
5. Page Layout:
- Options are "N-Up" or "Booklet Layout"
- Default is "N-Up". This option allows you to choose to print multiple pages on one side of a sheet
- "Booklet layout" automatically makes the job print in landscape orientation, 2 pages per side, and will print on both sides of a sheet. These options cannot be changed if you choose this style.
6. N-Up (Normal-Up) options:
- Only available if you choose "N-Up" under Page Layout. This allows you to print multiple pages on one side of a sheet. (This is not the same as 2-sided print!)
- Default is "Normal (one-up)", which is one page per side
- Other options allow for 2, 4, 6, 9, or 16 pages per side
7. Image Orientation:
- This will cause your job to print in Portrait or Landscape orientation
- If you choose "Booklet Layout" under Page Layout, it will automatically print in Landscape orientation and cannot be changed.
- Default is "Portrait"

