Accessing Celerra Shares from OSX
Jump to navigation
Jump to search
This guide will explain how to access shares located in the ECE Department's Celerra network file space (known as the Z drive on ECE Windows machines) from your Apple system. If you have questions or errors while following this process, please email ecehelp@ncsu.edu for assistance.
Notes:
- This is known to work with OS X 10.5 and 10.6. 10.4 has not been tested.
- This process requires that you know the specific name of the share you wish to access. Contact WolfTech if you do not know the name.
- Be sure you have access to the share as well. If you do not, contact WolfTech and request access. If you are a student requesting access to a research share, please copy your faculty advisor in your request.
- Currently, the connection to the shares is not permanent. If you logout, restart, or shutdown your system, you will need to re-connect to the share the next time you login.
- You must be connected to NCSU's VPN if you wish to access the share from off-campus. You can access the VPN from https://vpn.ncsu.edu/
Step 1 - Open Connect to Server
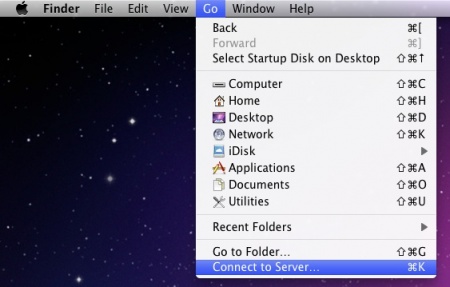
- On your Keyboard, press Command + K, or go to the Go menu and select the "Connect to server" option.
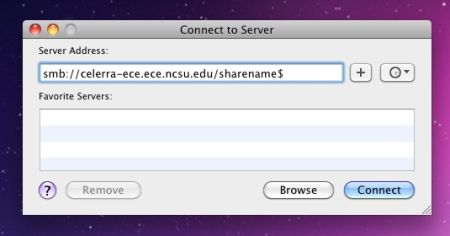
- The window below will appear. Under "Server address", type in the full path to the share you wish to access. If you do not know this path, contact WolfTech.
- When you have input the path, click Connect.
Troubleshooting
- If your system cannot connect to the share at this point, then:
- Confirm you input the share address correctly,
- Confirm you have internet access,
- If you are off-campus, comfirm you are connected to the VPN.
- If you have confirmed your system and settings are correct, contact WolfTech for further assistance.
Step 3 - Authenticating
- If the system can reach the share, you will receive the authentication window below.
- Make sure "Registered User" is selected, and login with your NCSU username and password.
- Optional: check the box at the bottom to save these credentials to your OS X keychain.
Troubleshooting
- If your system cannot connect to the share at this point, then:
- Confirm you have access to the share,
- Confirm you are not inputting your username and password incorrectly.
- Contact WolfTech for further assistance if you cannot resolve the issue.
- If the connection and authentication are successful, a Finder window will open displaying the contents of the share.
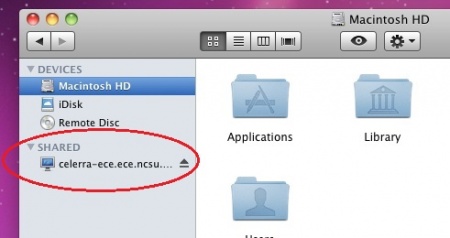
- Also, an entry for Celerra-ece will appear under the "Shared" list on the left hand side of the Finder window (see below). You can click on this to get to the share.
- We do not suggest creating a shortcut or link to the share. Previous testing has shown that this can cause slowdown with the startup and login of your system. Wolftech is currently doing more testing to find a solution.
- One thing you can do is save a favorite under Connect to Server. To do so:
- Open Connect to Server (Command + K or Go > Connect to Server),
- Type in the share address you wish to save as a favorite,
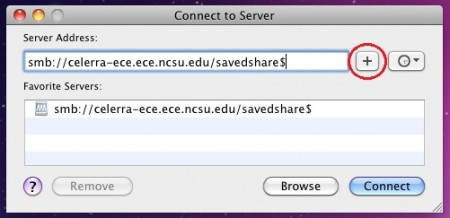
- Click the + button. The address will now show up under "Favorite Servers" (see below). You can now select that favorite and click Connect or double-click the favorite to make the connection.
- Repeat this process to add any other shares you need to access.


