Add printer to print server
All network printers in the ECE Department can be accessed through our central print server, ECEPRINT. In order for a user to connect to the a printer via the server, you must first add the printer to the server and share it. This article assumes you have access to add printers to ECEPRINT with your .admin account.
Step 1 - Connect to Server
Go to Start -> All Programs -> Accessories -> Communications, and run the Remote Desktop Connections tool. Enter "eceprint" in the blank and click "Connect". Log in to the server with your .admin domain account and password.
Step 2 - Starting the Add Printer Wizard
Click on the Start button, then click on Printers and Faxes. If Printers and Faxes is not available on the Start Menu, click on Control Panel, then on Printers and Faxes.
Click on Figure 1 in the gallery below to see the Printers and Faxes window. Once this opens, click on "Add a Printer" in the upper-left. Click NEXT to proceed to the Local or Network Printer page. Choose the first option, "Local printer attached to this computer", uncheck "Automatically detect and install my Plug and Play printer", and hit NEXT to proceed to the next step.
Step 3 - Adding a new TCP/IP port
See Figure 2. Choose the second option, "Create a new port", then choose "Standard TCP/IP Port" from the drop-down menu. Click NEXT to bring up the Add Standard TCP/IP Printer Port Wizard. Click NEXT.
See Figure 3. Enter in the FQDN of the printer in the first blank, for example, "arcticwolf.ece.ncsu.edu". The port name will be automatically filled in. Click NEXT. If the printer is turned on and active on the network, the server should be able to contact it and automatically configure the port. If for some reason it cannot contact the printer, you will need to tell it what kind of network card the printer uses. Use "Hewlett Packard Jet Direct" for HP printers and "Generic Network Card" for all others.
Click NEXT to reach a summary screen, and then click FINISH to return to the Add Printer Wizard.
Step 4 - Setting the Driver
After you've set up the port, you'll re-enter the Add Printer Wizard where it will ask you to choose a driver for the new printer. See Figure 4. Find the manufacturer in the left window, and choose the appropriate driver in the right window. If you cannot find the driver, download it from the web and use the "Have Disk" button to search for the driver files. If you download driver files to ECEPRINT, place them in a folder named after the printer model in C:\Drivers\.
Once you have chosen a driver, click NEXT.
Step 5 - Finish the Wizard
The next window will ask for a name for the new printer. Use just the given name of the printer, for example, "arcticwolf". Choose "No" for setting it as the default printer. Click NEXT.
The next window is the Printer Sharing window. Choose to share the printer, and use the same name you entered in the last window, for example, "arcticwolf". This is the name that will appear in the printer search directory when users attempt to add printers. Click NEXT.
Choose to not print a test page and click NEXT. You'll reach a summary screen that shows you the details of the printer you are adding. If anything appears incorrect, use BACK to go back and fix the errors. If everything is correct, click FINISH to end the wizard and add the printer to the server. Repeat these steps to add any additional printers.
Once you are finished, log out of ECEPRINT.
Gallery - Click on a picture to see in full-size
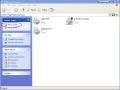
Fig 1 - Opening the Add Printer Wizard

Fig 2 - Creating a new TCP/IP port
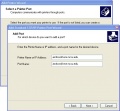
Fig 3 - Defining the new port

Fig 4 - Choosing a driver


