Adding Printer to RHEL
Jump to navigation
Jump to search
The printable version is no longer supported and may have rendering errors. Please update your browser bookmarks and please use the default browser print function instead.
Adding a printer to a RHEL-installed machine can be done by remote or if you are locally at the machine. Doing so requires sudo access to the machine, and if possible, always add the printer via the print server.
Adding the Printer
Gallery - Click on a picture to see in full-size


Using Text-based Setup
The text-based version of the printer config tool can be used if you are accessing the machine remotely or if you are using terminal/xterm.
- Starting the tool
- Run the following command:
sudo system-config-printer-tui
- This will start the TUI version of the printer config tool. See Figure 1 below to see what the tool will look like.
- Within the printer config tool you must use TAB to move between fields and ENTER to make choices.
- Choosing the queue type
- TAB to "NEW" and hit ENTER. This will open up a window for choosing the type of queue you wish to create.
- See Figure 2. As an example, we are adding the printer ARCTICWOLF to a computer. The first blank in this window is the name of the queue you are adding. Use the name of the printer for the queue name.
- Hit TAB once and use the down-arrow key to highlight "UNIX Print Queue LPD".
- Hit TAB one more time to highlight "NEXT" and hit ENTER.
- TAB to "NEW" and hit ENTER. This will open up a window for choosing the type of queue you wish to create.
- Setting up the queue
- A new window will open for designating the print server and queue. See Figure 3.
- In the first blank, enter "eceprint.ece.ncsu.edu".
- In the second blank, enter the name of the queue for the printer. The queue name is the same as the printer name, which should be labeled on the printer. If the printer is unlabeled or if your experience problems, ask your administrator.
- TAB to "NEXT" and hit ENTER.
- A new window will open for designating the print server and queue. See Figure 3.
- Designating the printer driver
- The next window is for choosing the printer driver that the new queue will use
- Use the Up and Down arrow keys to scroll through the list and SpaceBar to expand selections
- Once you have found the driver you wish to use, highlight it, then TAB to "NEXT" and hit ENTER.
- The next window is for choosing the printer driver that the new queue will use
- Finish and save
- You'll now see a summary screen, as shown in Figure 4. TAB to "Finish" and hit ENTER.
- You'll return to the screen shown in Figure 1. Add additional printers as necessary.
- To set a printer as default, highlight the printer, then TAB to "Default" and hit ENTER.
- You'll now see a summary screen, as shown in Figure 4. TAB to "Finish" and hit ENTER.
- When you are finished, TAB to "Exit" and hit ENTER.
- You'll get a msg saying that changes must be saved. Say YES and wait for the config tool to exit back to the command prompt.
- The printer should now be available for printing from the print dialog for programs, or by using the command lpr froma command prompt. If you have multiple printers added, you can print to a non-default printer by using lpr -Pqueuename.
- When you are finished, TAB to "Exit" and hit ENTER.
Gallery - Click on a picture to see in full-size
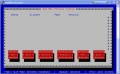
Printer Config Tool
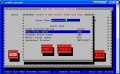
Choosing queue type
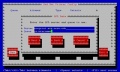
Inputting server and queue
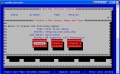
Summary screen


