Adding printer to OS X
All network printers in the ECE Department can be accessed through our central print server, ECE-PRINT-02. If you have any questions about the print server or experience any problems setting up a printer, please email ecehelp@ncsu.edu.
Please note that the directions and snapshots below should be valid for Mac OS X 10.4, 10.5, and 10.6. If you experience issues not covered by these directions please email us with a description of your problem and which OS version you are using.
Add printers in Mac OS X
Step 1 - Opening the Print & Fax window
To add printers in OS X, first open System Preferences either from your Dock icon, or from the Apple menu -> System Preferences. From there, choose Print & Fax under the Hardware section.
See Figure 1 below. Once in the Print & Fax window, click the + button to begin adding a new printer.
Step 2 - Choosing the printing protocol
Once the Printer Browswer window opens, click on the IP or IP Printing button at the top. This will allow you add a network printer through our department print server.
See Figure 2 below. Change the Protocol option to read "Line Printer Daemon - LPD".
Step 3 - Setting up print server and queue
Now you must input the print server and the queue name for the printer you wish to use on your Apple machine. In Figure 3 below we have used the printer HIPPOGRIFF as an example, but you should use the name of the printer you wish to use (should be labeled on the printer). If you do not know the queue name for your printer, please email ecehelp@ncsu.edu.
For Address, input "ece-print-02.ece.ncsu.edu", and for Queue, input the name of the printer you wish to use. For example, we have input "hippogriff".
Step 4 - Setting options and driver
See Figure 4. Input the printer name for Name (this will become the name of the printer queue in your list of available printers), and set the Location if you desire.
You then need to set the driver the OS X will use by filling out the Print With option. For HP printers, choose HP from the list and scroll to find the appropriate driver for your model. For Dell printers, choose "Generic Postscript Driver". Other makes and manufacturers choose the appropriate driver, but if you cannot find a match, choose "Generic Postscript Driver".
If you chose a generic driver, click Add to finish the process. If you chose a specific driver, OS X will search for installable options. You should leave these options as the defaults unless you are certain of options that should be changed or will not be used. Most importantly, you should activate the Duplex or Two-Sided Printing option if you know the printer has that option. Once the options are set, click Continue to finish the process.
You should now to able to print to the printer through your OS X applications. One last note is that if you need to change any settings for the printer, you may do so by going back into the Print & Fax, choosing the printer in the list, and clicking the "Printer Setup" button. However, you may only change drivers, installable options, or change Name and Location. Changing the print server or queue settings requires you to remove the printer and re-add it.
Gallery - Click on a picture to see in full-size

Fig 1 - Print & Fax window
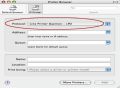
Fig 2 - Setting printing protocol

Fig 3 - Setting printer server and queue
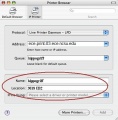
Fig 4 - Setting name and location


