Adding printer to Windows machine
All network printers in the ECE Department can be accessed through our central print server, ECEPRINT.
Add through Directory Search
Directory search allows you to make a search for the printer you wish to connect to, based on its name, location, or model. With this option, you can find a printer even if you do not know its name. This is the easiest method, but if you are not on the WOLFTECH domain, or if you are using a personal machine, you must add by the print server and queue.
Step 1 - Starting the Add Printer Wizard
To start the Add Printer wizard, click on the Start button, then click on Printers and Faxes. If Printers and Faxes is not available on the Start Menu, click on Control Panel, then on Printers and Faxes.
Click on Figure 1 in the gallery below to see the Printers and Faxes window. Once this opens, click on "Add a Printer" in the upper-left. Click NEXT to proceed to the Local or Network Printer page. Choose the second option, "A network printer, or a printer attached to another computer", and hit NEXT to proceed to the next step.
Step 2 - Choosing the Directory Search
You should now be looking at the Specify a Printer page. Make sure the first option, "Find a printer in the directory", is chosen and click NEXT.
The Directory Search Window should now open, as shown in Figure 2 below. You have three search options, name, location, or model. Fill in one or more of the blanks and then click the Find Now button. You can enter in partial information and the search will return all printers that match. For example, you could enter in "red" in the Name blank, and the search would return all printers with "red" in their name.
Step 3 - Connecting to the Printer
Figure 3 in the gallery below shows an example search. As you can see, we've entered "hipp" into the Name blank and started a search. The search has returned with HIPPOGRIFF as the only printer that matches that criteria.
Once you've completed the search and have found the printer you want, right-click on the printer's entry. You will get a menu as shown in Figure 3. Choose the "Connect" option and your computer will attempt to add the printer.
Step 4 - Finish the Wizard
If successful, the wizard will then ask if you wish to use this printer as your default printer. Choose either Yes or No, then click NEXT and you will come to the end of the wizard. Figure 4 below shows the summary screen of the Add Printer Wizard. Click FINISH to finish the wizard and the new printer will show up in the Printers and Faxes window and be available for printing in applications on your computer.
Gallery - Click on a picture to see in full-size
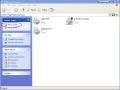
Fig 1 - Opening the Add Printer Wizard
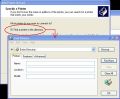
Fig 2 - Opening the Directory Search
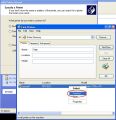
Fig 3 - Connecting to the Printer
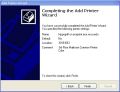
Fig 4 - Finishing the Wizard


Add by Print Server and Queue
The second way to add a printer still makes use of the Add Printer Wizard, but you will use a different option, and you must know the name of the printer you wish to use. Use this method if you are using a personal machine or if you are on the older ECEW2K domain.
Step 1 - Starting the Add Printer Wizard
To start the Add Printer wizard, click on the Start button, then click on Printers and Faxes. If Printers and Faxes is not available on the Start Menu, click on Control Panel, then on Printers and Faxes.
Click on Figure 1 in the gallery below to see the Printers and Faxes window. Once this opens, click on "Add a Printer" in the upper-left. Click NEXT to proceed to the Local or Network Printer page. Choose the second option, "A network printer, or a printer attached to another computer", and hit NEXT to proceed to the next step.
Step 2 - Enter in the Print Server and Queue
You should now be looking at the Specify a Printer page. Make sure the second option, "Connect to this printer", is chosen and click in the blank. You must fill in this blank with the print server and the queue of the printer that you wish to use. The print server is eceprint.ece.ncsu.edu, and the queue is the name of the printer. Fill in the blank in the following format:
\\eceprint.ece.ncsu.edu\<queue_name>
Figure 2 in the gallery below shows an example where we are connecting to the printer HIPPOGRIFF. As you can see, we have entered "\\eceprint.ece.ncsu.edu\hippogriff" in the blank. Once you have filled in the blank, click NEXT to proceed to the next step.
Step 3 - Authenticate to the Print Server
Your computer may take a moment to contact our print server, but eventually a login prompt should appear. You must authenticate with your WOLFTECH-domain login and password, which should be identical to your unityID and password. For questions about your WOLFTECH login and password, email ecehelp@ncsu.edu.
- If you are adding a printer from an ECEW2K-domained computer, enter your username as
WOLFTECH\username
- If you are adding a printer from a personal machine, enter your username as
wolftech.ad.ncsu.edu\username
Figure 3 shows an example of the login prompt and how to enter your username and password. After you have entered your username and password, click OK and the computer will attempt to add the printer.
Step 4 - Finish the Wizard
If successful, the wizard will then ask if you wish to use this printer as your default printer. Choose either Yes or No, then click NEXT and you will come to the end of the wizard. Figure 4 below shows the summary screen of the Add Printer Wizard. Click FINISH to finish the wizard and the new printer will show up in the Printers and Faxes window and be available for printing in applications on your computer.
Gallery - Click on a picture to see in full-size
Fig 1 - Opening the Add Printer Wizard

Fig 2 - Entering in the print server and share
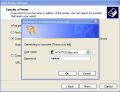
Fig 3 - Entering in WOLFTECH authentication
Fig 4 - Finishing the Wizard

