Difference between revisions of "SCCM SelfService"
Jump to navigation
Jump to search
m |
m |
||
| Line 1: | Line 1: | ||
__NOTOC__ | __NOTOC__ | ||
Self Service advertisements in Microsoft's SCCM allow us to provide users on Microsoft Windows PCs with the ability to install software at their own convenience. In nearly all cases, these installs will be completely automated and so will require no user input or interaction aside from starting the software install. This guide is intended to walk a user through the steps of locating and utilizing Self Service advertisements on their machine. | Self Service advertisements in Microsoft's SCCM allow us to provide users on Microsoft Windows PCs with the ability to install software at their own convenience. In nearly all cases, these installs will be completely automated and so will require no user input or interaction aside from starting the software install. This guide is intended to walk a user through the steps of locating and utilizing Self Service advertisements on their machine. | ||
| + | |||
'''NOTES:''' | '''NOTES:''' | ||
Revision as of 14:06, 17 October 2011
Self Service advertisements in Microsoft's SCCM allow us to provide users on Microsoft Windows PCs with the ability to install software at their own convenience. In nearly all cases, these installs will be completely automated and so will require no user input or interaction aside from starting the software install. This guide is intended to walk a user through the steps of locating and utilizing Self Service advertisements on their machine.
NOTES:
- Administrator access is not required to run Self Service advertised installs.
- If your machine does not have the Control Panel applets described on this page, or never lists or provides notifications of advertisements, there may be an issue with the SCCM client on your machine. Contact your department or college computer support department for assistance, and be sure to provide the name of your machine.
- All screen images on this page are from Windows 7, but text and options should be the same for Windows XP. However, we cannot guarantee that all advertised programs will work properly with Windows XP.
- At this time, Windows 7 and XP are the only versions of Windows supported for Self Service advertisements.
Finding Self Service Advertisements
Notifications
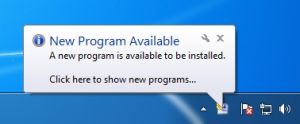
- When your machine receives an advertisement, it will notify you that a new program is available to install. The notification will look like the image in Figure 1.
Finding advertisements in Control Panel
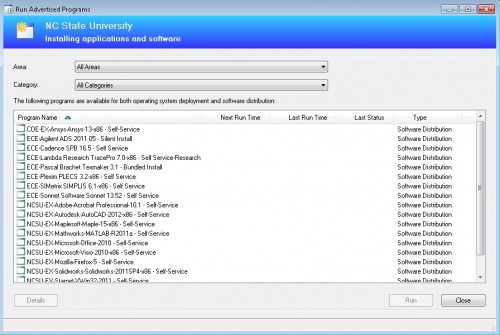
- If you click on the balloon notification, Windows will open an applet that lists available advertisements and allows you to start them. However, you can find this applet manually by navigating to Control Panel > Programs > Run Advertised Programs. That will open the window shown in Figure 2. From here you can select a program and choose to install it. It will also give details on the last time an install was run and whether it was considered successful.
- Please note, if this list is empty, most likely your machine has not yet updated and received its assignments. To resolve this, wait 10-15 minutes and then check again. If necessary, you can force an update manually. To do so, go to Control Panel > System and Security > Configuration Manager, click on the Actions Tab, and initiate the "Machine Policy Retrieval and Evaluation Cycle" action.
Understanding and Running an Advertisement
Advertisement Details
- Before you start any install, we strongly recommend that you review any details provided about the software install. It's important to understand how long an install may potentially take and the necessary free disk space required for the full installation. This is especially true considering many installs may be completely silent, and so you will not receive any indication that it has succeeded or failed.
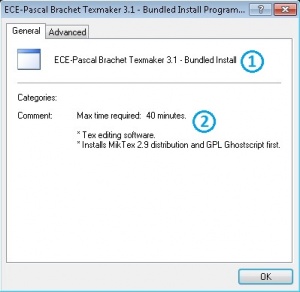
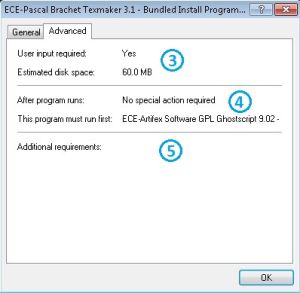
- To view the details of an install, highlight an advertised install in the list and click the Details button to view the window shown in Figure 3 and Figure 4.
- What to look for:
- Package Name: All package names should include the software name, the manufacturer of the software, and the software version. Any other details are for internal use.
- Comments: Important details regarding the package will be placed here. There is limited space in this section, but at the least we will try to include the maximum length of time a package should take to install, whether or not the package is completely silent, and if a restart is required before using the software.
- Top Section
- User Input required: If this is "No", then the install is completely silent. If it is "Yes", then you may see progress on the install, but you will not necessarily be prompted for any input.
- Estimated disk space: The necessary free disk space required on your hard drive for the install. Please note, all software packages will install to your C drive.
- Middle Section
- After program runs: This can be ignored.
- This program must run first: Some softwares may require small scripts or prerequisite installers to run first. These will almost always be silent.
- Additional requirements: Any additional required information that cannot be fit in comments may go here. An example may be the name of a companion software that is required
Running an Advertised Install
- Again, please not that you do not have to be an Administrator on the machine to run an advertised install. However, once installed, a software may require administrator privileges in order to use certain features.
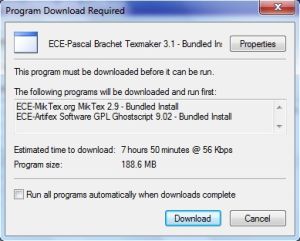
- Select a software from the list and click Run. The window in Figure 5 will appear:
|
|
- Once you are ready, click the Download button. Your computer will begin downloading the install media. Once it is finished, it will prompt you to begin the install, or will begin it automatically if you checked that option earlier.
- Again, please note that some installs may be completely silent. For those installs, you should allow the maximum allowed time to pass before attempting to use the software.
Additional details and troubleshooting
- If a program fails to download or install, check the amount of free disk space on your C drive. It is good practice to keep at least 10% free disk space for Microsoft Windows.
- If a silent install appears to have failed, restart your computer. If it is still missing, attempt the install again.
- If you receive an error message either from the install or during the download process, contact your department or college computer support for assistance.
