Difference between revisions of "User:Bpcarty/Printing Powerpoint to BLUEWHALE"
m |
|||
| (3 intermediate revisions by the same user not shown) | |||
| Line 1: | Line 1: | ||
| + | __NOTOC__ | ||
=Printing to BLUEWHALE= | =Printing to BLUEWHALE= | ||
| Line 7: | Line 8: | ||
Located near BLUEWHALE is a computer station that you may use to print to the printer. We encourage users to use this station when printing so that you can view your document as it prints and cancel it should there be any errors, saving paper and ink. | Located near BLUEWHALE is a computer station that you may use to print to the printer. We encourage users to use this station when printing so that you can view your document as it prints and cancel it should there be any errors, saving paper and ink. | ||
| + | ==Printing a Document== | ||
| − | + | The two best options for printing to BLUEWHALE are through Microsoft PowerPoint or Adobe Reader/Acrobat. At this time, these are the only programs that have been used to print. If you need to print through a different program, please email us for assistance. Also note that the directions in this document are for MS PowerPoint 2003 and Adobe Reader/Acrobat 7. If you are having difficulties with previous or future versions, again, please let us know. | |
| − | + | There are two parts to printing to BLUEWHALE. First you must tell the printer what paper size and orientation you wish to print. This is covered in steps 1 and 2 below, and are the same for PowerPoint and Acrobat. The second part is setting an option that will fit the poster to the margins of the paper size you have chosen. This is covered in step 3, and differs depending on what program you are using. | |
| − | + | ===1) Setting Paper Size=== | |
| − | * | + | * Open the Print screen. Choose BLUEWHALE as your printer, and click on "Properties". |
| − | * | + | * See Figure 1 below. Click on "Custom Paper Size" and set it to the dimensions of your poster. The first box is the width, the second box is the height. '''Please note''' that at least one of these dimensions must be 36 in. or less. |
| − | + | ===2) Setting Poster Orientation=== | |
| − | + | * Click on the "Finishing" tab. '''For portrait orientation''', click the "Portrait" button. | |
| + | |||
| + | * '''For landscape''', click the "Landscape" button, and also check the "Rotate by 90 degrees" box. See Figure 2 below. | ||
| + | |||
| + | ===3) Setting Program-specific Options=== | ||
| + | |||
| + | * After setting the paper size and orientation, click OK to return to the Print screen. The final change you must make depends on what program you are using to print. | ||
| + | |||
| + | * '''For Microsoft PowerPoint''', click the "Scale to fit paper" option. See Figure 3 below. | ||
| + | |||
| + | * '''For Adobe Reader/Acrobat''', set the Page Scaling option to "Fit to Printer Margins". See Figure 4 below. | ||
| + | |||
| + | |||
| + | <gallery> | ||
| + | Image:BW-properties1.jpg|Fig 1 - Setting Paper Size | ||
| + | Image:BW-properties2.jpg|Fig 2 - Choosing Landscape Orientation | ||
| + | Image:BW-powerpoint.jpg|Fig 3 - PowerPoint Print Options | ||
| + | Image:BW-adobe.jpg|Fig 4 - Adobe Print Options | ||
| + | </gallery> | ||
| + | |||
| + | ==IMPORTANT NOTES== | ||
| + | |||
| + | * A roll of paper on BLUEWHALE is 36 in. wide. This means that '''at least one''' of the dimensions of your poster must be 36 in. or less. | ||
| + | |||
| + | * Create your poster in the size that you intend to print it. PowerPoint allows you to set a page size under File -> Page Setup and any image program allows you to set the size of the picture/document you are creating before you start on it. | ||
| + | |||
| + | * Posters can be printed in Portrait or Landscape. | ||
| + | |||
| + | * Print in "Normal" quality only. There is little to no discernible difference between "Normal" and "Best" qualities. | ||
| + | |||
| + | * We '''strongly''' encourage you to use a white background for your poster. If you absolutely must have a colored background, use a single color that is not heavy or dark. Nearly all programs allow you to reduce the intensity or percentage of a color before you use it. Do NOT use patterns or your poster will print very slowly. | ||
Latest revision as of 11:30, 7 March 2006
Printing to BLUEWHALE
Location and Access
BLUEWHALE is located in the Monteith Engineering Research Center (MRC), just outside room 415. Currently the printer is restricted to faculty and staff. If you need access or assistance with printing, or if the printer is out of paper or ink, email us at ecehelp@ncsu.edu.
Located near BLUEWHALE is a computer station that you may use to print to the printer. We encourage users to use this station when printing so that you can view your document as it prints and cancel it should there be any errors, saving paper and ink.
Printing a Document
The two best options for printing to BLUEWHALE are through Microsoft PowerPoint or Adobe Reader/Acrobat. At this time, these are the only programs that have been used to print. If you need to print through a different program, please email us for assistance. Also note that the directions in this document are for MS PowerPoint 2003 and Adobe Reader/Acrobat 7. If you are having difficulties with previous or future versions, again, please let us know.
There are two parts to printing to BLUEWHALE. First you must tell the printer what paper size and orientation you wish to print. This is covered in steps 1 and 2 below, and are the same for PowerPoint and Acrobat. The second part is setting an option that will fit the poster to the margins of the paper size you have chosen. This is covered in step 3, and differs depending on what program you are using.
1) Setting Paper Size
- Open the Print screen. Choose BLUEWHALE as your printer, and click on "Properties".
- See Figure 1 below. Click on "Custom Paper Size" and set it to the dimensions of your poster. The first box is the width, the second box is the height. Please note that at least one of these dimensions must be 36 in. or less.
2) Setting Poster Orientation
- Click on the "Finishing" tab. For portrait orientation, click the "Portrait" button.
- For landscape, click the "Landscape" button, and also check the "Rotate by 90 degrees" box. See Figure 2 below.
3) Setting Program-specific Options
- After setting the paper size and orientation, click OK to return to the Print screen. The final change you must make depends on what program you are using to print.
- For Microsoft PowerPoint, click the "Scale to fit paper" option. See Figure 3 below.
- For Adobe Reader/Acrobat, set the Page Scaling option to "Fit to Printer Margins". See Figure 4 below.
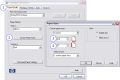
Fig 1 - Setting Paper Size
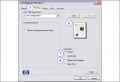
Fig 2 - Choosing Landscape Orientation
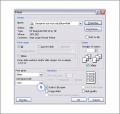
Fig 3 - PowerPoint Print Options
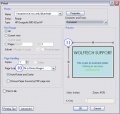
Fig 4 - Adobe Print Options


IMPORTANT NOTES
- A roll of paper on BLUEWHALE is 36 in. wide. This means that at least one of the dimensions of your poster must be 36 in. or less.
- Create your poster in the size that you intend to print it. PowerPoint allows you to set a page size under File -> Page Setup and any image program allows you to set the size of the picture/document you are creating before you start on it.
- Posters can be printed in Portrait or Landscape.
- Print in "Normal" quality only. There is little to no discernible difference between "Normal" and "Best" qualities.
- We strongly encourage you to use a white background for your poster. If you absolutely must have a colored background, use a single color that is not heavy or dark. Nearly all programs allow you to reduce the intensity or percentage of a color before you use it. Do NOT use patterns or your poster will print very slowly.