Difference between revisions of "Xerox Printing Guide for OS X"
m |
m |
||
| Line 30: | Line 30: | ||
---- | ---- | ||
| − | [[Image:mastiff-osx1.jpg|left|thumb|500px|'''Figure 1 - Available Option Categories''']] | + | <table> |
| + | <TR><TD>[[Image:mastiff-osx1.jpg|left|thumb|500px|'''Figure 1 - Available Option Categories''']] | ||
| + | </TD></TR> | ||
| + | </table> | ||
| − | ''Figure 1'' | + | ''Figure 1'' above shows the different categories of options for your print job. The categories described below contain the options common to most standard print jobs. Most of the other categories in this list contain options that are unnecessary or are not supported by MASTIFF. |
1. '''Copies & Pages:''' | 1. '''Copies & Pages:''' | ||
| Line 44: | Line 47: | ||
5. '''Summary:''' | 5. '''Summary:''' | ||
:* Expandable list of categories and options to quickly and easily review all options before printing | :* Expandable list of categories and options to quickly and easily review all options before printing | ||
| − | |||
| − | [[Image:mastiff-osx2.jpg|left|thumb|500px|'''Figure 2 - Copies & Pages options''']] | + | <table> |
| − | [[Image:mastiff-osx3.jpg|thumb|500px|'''Figure 3 - Layout options''']] | + | <TR><TD>[[Image:mastiff-osx2.jpg|left|thumb|500px|'''Figure 2 - Copies & Pages options''']] |
| − | < | + | </TD><TD>[[Image:mastiff-osx3.jpg|thumb|500px|'''Figure 3 - Layout options''']] |
| − | < | + | </TD></TR> |
| + | </table> | ||
6. '''Copies and Collating:''' (''Figure 2 - above left'') | 6. '''Copies and Collating:''' (''Figure 2 - above left'') | ||
| Line 59: | Line 62: | ||
:* The paper orientation will change depending on how many pages per side you choose. For example, 1 page per side is done in Portrait, but 2 pages per side is done in Landscape. Pay attention to the preview on the left. | :* The paper orientation will change depending on how many pages per side you choose. For example, 1 page per side is done in Portrait, but 2 pages per side is done in Landscape. Pay attention to the preview on the left. | ||
9. '''Two-sided printing:''' (''Figure 3 - above right'') | 9. '''Two-sided printing:''' (''Figure 3 - above right'') | ||
| − | :* Choose to print on one or both sides of a sheet of paper. | + | :* Choose to print on one or both sides of a sheet of paper. |
| − | [[Image:mastiff-osx4.jpg|left|thumb|500px|'''Figure 4 - Booklet options''']] | + | <table> |
| − | [[Image:mastiff-osx5.jpg|thumb|500px|'''Figure 5 - Printer Features options''']] | + | <TR><TD>[[Image:mastiff-osx4.jpg|left|thumb|500px|'''Figure 4 - Booklet options''']] |
| − | < | + | </TD><TD>[[Image:mastiff-osx5.jpg|thumb|500px|'''Figure 5 - Printer Features options''']] |
| − | < | + | </TD></TR> |
| + | </table> | ||
10. '''Enable Booklet:''' (''Figure 4 - above left'') | 10. '''Enable Booklet:''' (''Figure 4 - above left'') | ||
| Line 75: | Line 79: | ||
12. '''Stapling:''' (''Figure 5 - above right'') | 12. '''Stapling:''' (''Figure 5 - above right'') | ||
:* Choose between no staples, 1 staple, or 2 staples. | :* Choose between no staples, 1 staple, or 2 staples. | ||
| − | :* This option is under the Finishing Options 1 submenu. | + | :* This option is under the Finishing Options 1 submenu. |
| − | [[Image:mastiff-osx6.jpg|left|thumb|500px|'''Figure 6 - Summary''']] | + | <table> |
| − | < | + | <TR><TD>[[Image:mastiff-osx6.jpg|left|thumb|500px|'''Figure 6 - Summary''']] |
| − | < | + | </TD></TR> |
| + | </table> | ||
''Figure 6'' above shows the display of the Summary category. Click on the arrow to the left of an option in the list to view the current settings. Once you have reviewed all options and are ready to print, click the '''Print''' button in the bottom right corner to print your job. | ''Figure 6'' above shows the display of the Summary category. Click on the arrow to the left of an option in the list to view the current settings. Once you have reviewed all options and are ready to print, click the '''Print''' button in the bottom right corner to print your job. | ||
Revision as of 12:19, 14 February 2007
Physical access to MASTIFF is restricted to the hours of 8am - 5pm, Monday through Friday. You can print to it outside of these hours, but you won't be able to pickup the document until the Student Services office reopens.
Adding the Printer
MASTIFF is available over the network via our domain print server. To add the copier/printer to your machine, please view the following page:
- Adding printer to OS X
- A driver for MASTIFF is pre-loaded in OS X 10.4. Choose "Xerox", then choose "Xerox WCP 90" from the list of models.
Important Notes
- We strongly encourage you to make use of MASTIFF for print/copy jobs that exceed 35 total sheets.
- "Sheets" refers to a full sheet of paper. So 35 sheets could be a 35 page document, or 5 copies of a 7 page document.
- MASTIFF is black and white only.
- MASTIFF will automatically create a cover page for your job which shows the date and time of the print out for easier identification.
- MASTIFF can also auto-collate and staple your document(s), as well as produce booklet-style printouts or multiple-pages-on-a-page for handouts.
Available Supplies
- By default, MASTIFF is loaded with standard 8.5 x 11 white paper.
- For jobs requiring paper in different colors, styles or sizes, supplies must be manually loaded before running your job. Also, remaining supplies should be unloaded from the printer after your job is finished.
Printing a Document
To print a job, open the print dialogue (Command + P or File -> Print) and select MASTIFF from your list of available printers. If you have not yet added the printer, see Adding the Printer above. Once you have selected the printer, there will be several different option sets available for you to change the style and output of your job. The images below will describe the options that are necessary for most common print jobs. All images below show the default options for these menus. If you have questions about the more advanced options, please contact WolfTech for assistance.
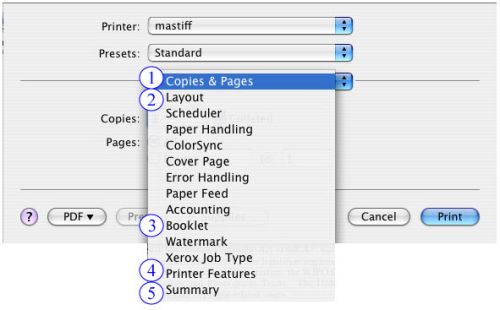
Figure 1 above shows the different categories of options for your print job. The categories described below contain the options common to most standard print jobs. Most of the other categories in this list contain options that are unnecessary or are not supported by MASTIFF.
1. Copies & Pages:
- Contains options for multiple copies and also for collating
2. Layout:
- Contains options for multiple pages on a side, borders, and 2-sided printing
3. Booklet:
- Contains options for booklet style printing
4. Printer Features:
- Contains options for print resolution and stapling
5. Summary:
- Expandable list of categories and options to quickly and easily review all options before printing
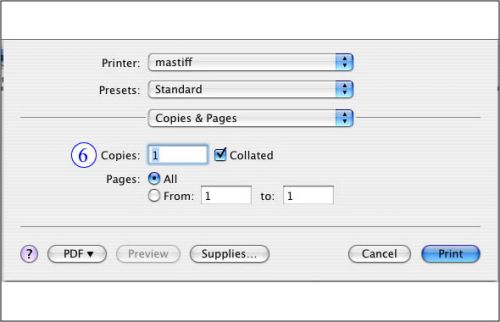
6. Copies and Collating: (Figure 2 - above left)
- Choose the number of copies of your print job, and check the box to the right if you wish your job to be collated.
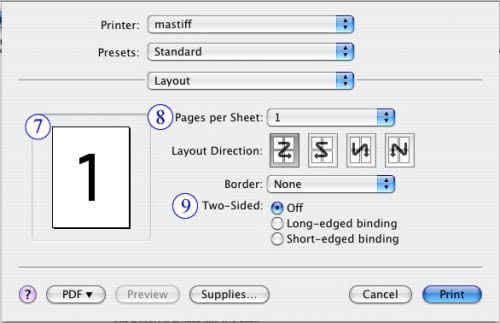
7. Page preview: (Figure 3 - above right)
- Gives a preview of how a page side will appear depending on the options you choose.
8. Pages per sheet: (Figure 3 - above right)
- Choose between 1, 2, 4, 6, 9, or 16 pages per side.
- The paper orientation will change depending on how many pages per side you choose. For example, 1 page per side is done in Portrait, but 2 pages per side is done in Landscape. Pay attention to the preview on the left.
9. Two-sided printing: (Figure 3 - above right)
- Choose to print on one or both sides of a sheet of paper.
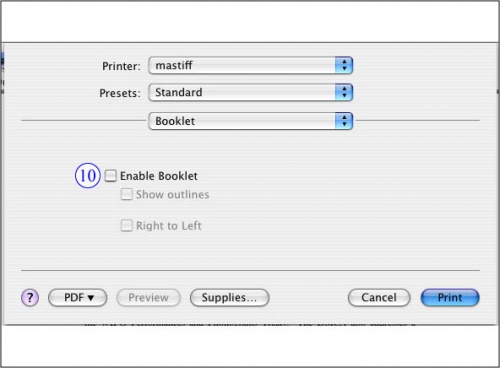
10. Enable Booklet: (Figure 4 - above left)
- Used to print your job in a booklet style
- Important: Options in the "Layout" category can conflict/overwrite the booklet options, and we recommend you do not use the booklet options.
- If you wish to print in booklet style, go into the "Layout" category (see Figure 3) and change options to 2 pages per side, single hairline border, and two-sided printing with short-edge binding.
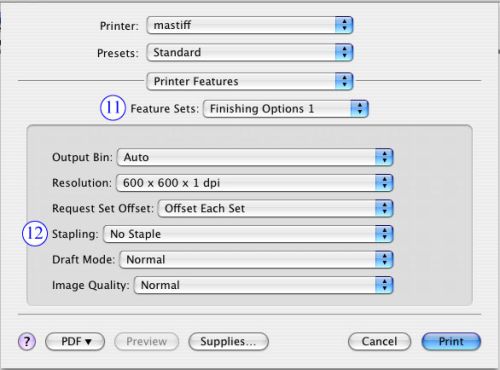
11. Feature sets: (Figure 5 - above right)
- A submenu of the Printer Features category. There are three options, but most of the settings under these submenus cannot be used because the feature is either not supported or certain supplies are not available.
- The only submenu we recommend using is Finishing Options 1.
12. Stapling: (Figure 5 - above right)
- Choose between no staples, 1 staple, or 2 staples.
- This option is under the Finishing Options 1 submenu.
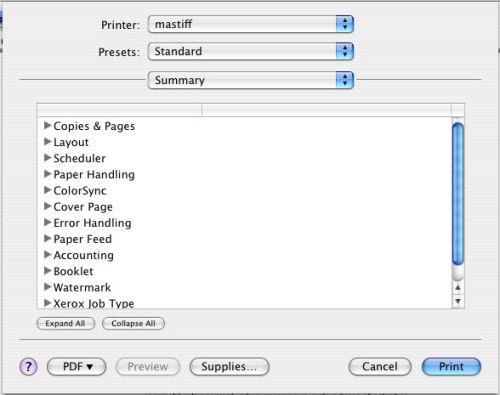
Figure 6 above shows the display of the Summary category. Click on the arrow to the left of an option in the list to view the current settings. Once you have reviewed all options and are ready to print, click the Print button in the bottom right corner to print your job.
