Calendar:Creating Groups
Jump to navigation
Jump to search
Groups are useful for organizing other users on Oracle that you deal with. Add people to a group if you all have a project together, work at the office together, etc. Don't add people you don't know to groups.
Admin Groups
- NOTE: You must be an administrator to create an admin group.
Public Groups
- NOTE: You must have the needed permissions to create a public group.
Private Groups
- Note: Private groups can only be seen, edited, and used by the creator of the group.
- Open the Tools menu
- Select Manage Groups...
- Click the New... button
- In the Group Name box, enter the name
- Select Private from the drop-down menu
- If you know the name of a person:
- Enter it in the Add member: box
- Press the green checkmark button
- If the person is on the system, there name will show up in the box below
- Enter it in the Add member: box
- If you need to search for someone
- Press the magnifying glass button next to the checkmark button
- Enter any known information in the appropriate box (even if its just the first initial, enter it)
- Anyone on the system who fits that information will show up in the box in the lower left corner
- Select the name you were looking for and press the Add>> button
- This name will now be in the box on the right side
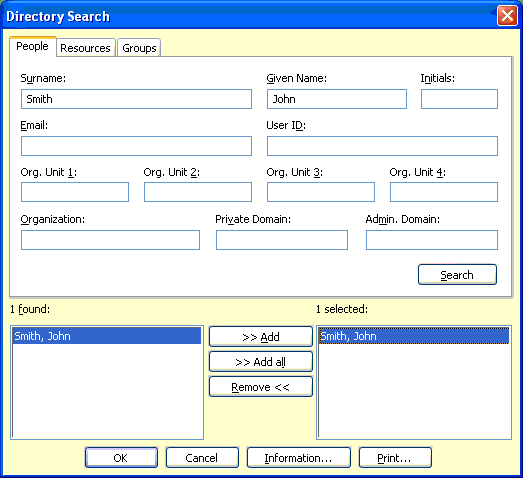
- If you'd like to add everyone under that search, press Add All>>
- If you decide you don't want someone in the group after adding them, highlight there name on the right side and select <<Remove
- When you have all the names you were looking for in the box on the right side, press OK
- All names on the right side will now be in the member's box on the New Group window
- When you have everyone you'd like in the group, click OK


Members-Only Groups
- Note: Members-Only Groups can be seen and used by all members, but only the creator can edit the group.
- Open the Tools menu
- Select Manage Groups...
- Click the New... button
- In the Group Name box, enter the name
- Select Members-Only from the drop-down menu
- If you know the name of a person:
- Enter it in the Add member: box
- Press the green checkmark button
- If the person is on the system, there name will show up in the box below
- Enter it in the Add member: box
- If you need to search for someone
- Press the magnifying glass button next to the checkmark button
- Enter any known information in the appropriate box (even if its just the first initial, enter it)
- Anyone on the system who fits that information will show up in the box in the lower left corner
- Select the name you were looking for and press the Add>> button
- This name will now be in the box on the right side
- If you'd like to add everyone under that search, press Add All>>
- If you decide you don't want someone in the group after adding them, highlight there name on the right side and select <<Remove
- When you have all the names you were looking for in the box on the right side, press OK
- All names on the right side will now be in the member's box on the New Group window
- When you have everyone you'd like in the group, click OK
Back to the Calendar page