Difference between revisions of "NCSU VPN"
Jump to navigation
Jump to search
| Line 60: | Line 60: | ||
* Please note, this method is '''required''' for Mac OS machines and Apple iOS devices. | * Please note, this method is '''required''' for Mac OS machines and Apple iOS devices. | ||
| − | * For downloads and installation instructions specific to your operating system, navigate to NCSU Comtech's [http://comtech.ncsu.edu/networking/sslvpn_instructions.php | + | * For downloads and installation instructions specific to your operating system, navigate to NCSU Comtech's [http://comtech.ncsu.edu/networking/sslvpn_instructions.php installation instructions page]. |
* Administrator or root privileges are required for manual installations. | * Administrator or root privileges are required for manual installations. | ||
* For details on how to launch, configure, and use the application once installed, see the next section. | * For details on how to launch, configure, and use the application once installed, see the next section. | ||
Revision as of 13:15, 3 January 2012
NC State University's SSL VPN Service
To access secure campus resources at NC State University, VPN client software must be installed on the off-campus computer. When opened, the VPN client requires a username and password to verify the user's identity. Once the user's identity has been verified, the program connects the machine to a virtual NC State network, allowing access to restricted services.
All users should note that NC State University's Computer Use Regulations apply to VPN. For details, please view the VPN Acceptable Use Policy.
Please also review the system requirements for your operating system at these links:
Installing the Cisco AnyConnect VPN Client
There are two methods for installing the Cisco AnyConnect client.
- The first method installs the client automatically via the SSL VPN website, and can be used for Microsoft Windows and Linux machines.
- The second method is to download the client from NCSU Comtech's website and install it manually. Manual installation is required for Mac OS machines and Apple iOS devices, and can be used for Windows and Linux machines if the automatic method fails.
Method 1 - Automatically via Web Browser
|
|
- Please note, administrative privileges in Windows are required for this method.
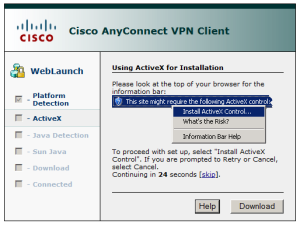
- If you are using Microsoft Windows and Internet Explorer, the installer will use ActiveX to install the client. Figure 2 below and to the left shows the start of this install.
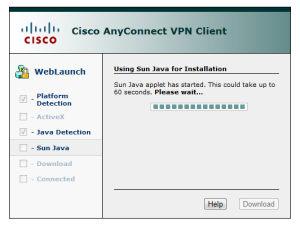
- If you are using a Linux distribution, or Microsoft Windows with any other web browser, the installer will use Java to install the client. Figure 3 below and to the right shows the start of this install. If you do not have Java, you can download it from here.
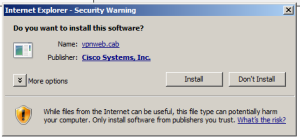
- Before the client begins installing, your operating system will likely ask your permission to allow the VPN site to install or run certain components. These prompts may come up as toolbars at the top or bottom of your browser, or they may come up as new dialogue boxes. Figure 4 shows a prompt for the ActiveX install, while Figure 5 shows a prompt for the Java install.
- Accept or allow as needed and the client installation will begin.
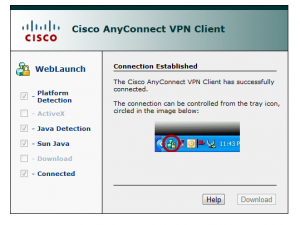
- If the client install is successful, it should automatically connect to the VPN service. The SSL VPN website should then display a page similar to Figure 6 below. (NOTE: This particular view was captured from a Windows machine, but a Linux machine should display a similar page.)
|
|
Method 2 - Manual Install
- Please note, this method is required for Mac OS machines and Apple iOS devices.
- For downloads and installation instructions specific to your operating system, navigate to NCSU Comtech's installation instructions page.
- Administrator or root privileges are required for manual installations.
- For details on how to launch, configure, and use the application once installed, see the next section.
Mac OS
- Users of 10.5, 10.6, or 10.7 should download version 2.5.x from the NCSU Comtech site provided above.
- Users of 10.4 should download version 2.3.x.
- Open the .dmg file and run the vpn.pkg file to start the installer.
- Proceed through the installer. The application will be installed to Applications > Cisco and may be launched from there.
Apple iOS
- From your iOS device, go to iTunes and search for Cisco AnyConnect, or click on this link to download and install the app.
- Once installed, start the app, click on "Add VPN Connection".
- Give the connection a name, like NCSU VPN.
- Set vpn.ncsu.edu as the server address.
- Enable Network Roaming.
- Save the connection and then set AnyConnect VPN to ON. You will be prompted for credentials. Use your NCSU unityID and password.
Windows
- Only use the manual method if the automatic method fails or is somehow unavailable.
- Download and install the appropriate installer from the NCSU Comtech site provided above.
Using the Cisco AnyConnect VPN Client
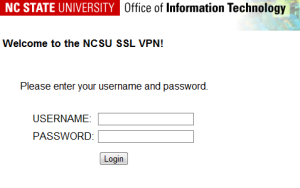
- Once installed, you can launch the client and connect to the VPN through your web browser. Simply navigate again to https://vpn.ncsu.edu/ and authenticate with your NCSU unityID and password. The site will detect that the client is already installed and launch it automatically.
- This method works from Windows, Linux, and Mac OS.
- If you prefer to manually launch the client, locate the shortcut on your system and open it.
- Windows - Start > All Programs > Cisco > Cisco AnyConnect VPN Client
- Mac OS - Applications > Cisco
- Enter vpn.ncsu.edu for the "Connect to" option
- Enter in your NCSU unityID and password
- Click Connect.
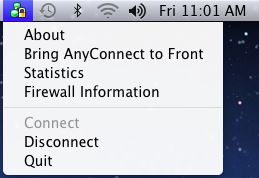
- When the client is launched and connected, you will see an icon in your system tray. Figures 7 and 8 below show the appearance of the icon in Windows and Mac OS respectively.
- Clicking on the icon once will bring up the menu shown in the figures below as well, giving options to disconnect from the VPN or quit the client.
- Windows - double-clicking the icon will bring up the client interface.
- Mac OS - "Bring AnyConnect to Front" will bring up the client interface.
