Large Format Printing for Windows
Location and Access
ECE-POSTERS1 is located in room 3029 EB2 and is currently restricted to ECE Department faculty, staff, RAs and TAs. Located near ECE-POSTERS1 is a computer station that you may use to print to the printer. We encourage users to use this station when printing so that you can view your document as it prints and cancel it should there be any errors, saving paper and ink.
For issues not covered by this document, contact WolfTech Support. If you need technical assistance with the printer, email ecehelp@ncsu.edu, or if an emergency, call the Wolftech workroom at 515-0124.
For users in the MRC, ECE-POSTERS2 is an identical model printer that is located in 426 MRC.
Adding the Printer
ECE-POSTERS1 is available over the network via our domain print server. To add the copier/printer to your machine, please view the following pages:
- Domained machines: Windows 7
- Personal / non-domained machines: Windows 7
Important Notes
- Please inform WolfTech or the main office when supplies for ECE-POSTERS1 are low.
- Use this template whenever possible -- sample poster template
- A roll of paper on ECE-POSTERS1 is 36 in. wide. This means that at least one of the dimensions of your poster must be 36 in. or less.
- Create your poster in the size that you intend to print it. PowerPoint allows you to set a page size under File -> Page Setup and any image program allows you to set the size of the picture/document you are creating before you start on it.
- Posters can be printed in Portrait or Landscape.
- Additional supplies are provided in the cabinet in 3029 EB2. Please notify WolfTech or the ECE Main Office if supplies are low.
- Print in "Normal" quality only. There is little to no discernible difference between "Normal" and "Best" qualities.
- We strongly encourage you to use a white background for your poster. If you absolutely must have a colored background, use a single color that is not heavy or dark. Nearly all programs allow you to reduce the intensity or percentage of a color before you use it. Do NOT use patterns or your poster will print very slowly.
- Use short filenames for your files. ECE-POSTERS1 will not print files with long filenames.
Application-specific Options
There are some options that are specific to the application you are using that must be set or changed before your job can be printed. At this time, Microsoft Powerpoint is the preferred application for printing posters/jobs to ECE-POSTERS1, however, other programs may be used. If you need to print through a different program, please email us for assistance.
Microsoft PowerPoint
- Open the print dialogue (CTRL + P or File -> Print) and check the box next to "Scale to Fit Paper"
Microsoft Publisher
- INVESTIGATING
Adobe Acrobat/Reader
- Open the print dialogue (CTRL + P or File -> Print) and change the Page Scaling option to "Fit to Printer Margins"
Adobe Illustrator CS2
- INVESTIGATING
Printing a Document
If you have not yet added ECE-POSTERS1 to your list of available printers, see Adding the Printer above.
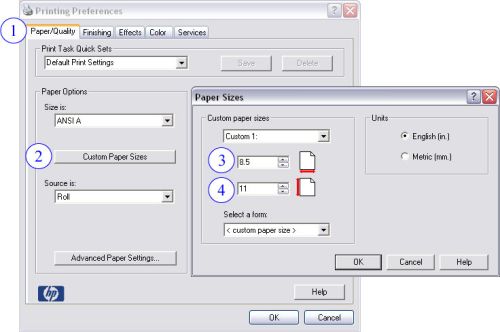
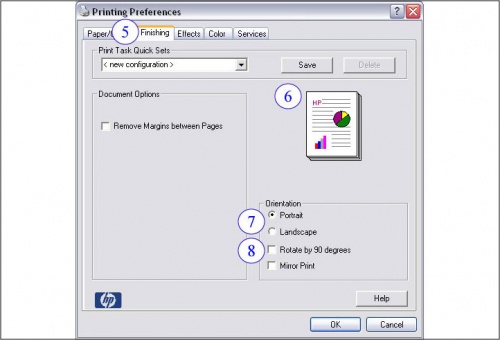
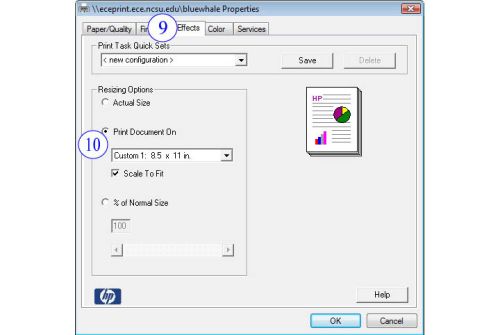
When printing to ECE-POSTERS1 , you must first set the printer to print to the dimensions of your poster. These options are the same regardless of the program you are using, and are described in the two figures and notes below. To reach these options, open the print dialogue (CTRL + P or File -> Print) and select ECE-POSTERS1 from your list of available printers. Once you have selected the printer, click the "Properties" or "Preferences" button to reach the Printing Preferences window shown in the figures below.
1. Paper/Quality tab:
- You will automatically start here when you open the Printing Preferences for ECE-POSTERS1
2. Custom Paper Sizes:
- Click here to set the paper size to the dimensions of your poster
- This will open the "Paper Sizes" window shown in Figure 1
- A roll of paper on ECE-POSTERS1 is 36 in. wide. This means that at least one of the dimensions of your poster must be 36 in. or less
- Click here to set the paper size to the dimensions of your poster
3. Custom Paper Width:
- This is the width of your poster
- By default, this is in inches.
- This is the width of your poster
4. Custom Paper Height:
- This is the height of your poster
- By default, this is in inches.
- This is the height of your poster
5. Finishing tab:
- After setting the custom paper size, click here
6. Preview image:
- This shows a preview of how your poster will be oriented when it exits ECE-POSTERS1
7. Orientation:
- Choose Portrait or Landscape to match the orientation of your poster
- If Landscape, see #8 below
- Choose Portrait or Landscape to match the orientation of your poster
8. Rotate by 90 Degrees:
- Check this box if your poster is printing in Landscape orientation
9. Effects tab:
- After setting the paper orientation, click here
10. Resizing options:
- Choose the "Print Document On" option, and make sure that "Scale to Fit" is checked.
- The drop-down menu should already be showing your custom paper size and does not need to be changed.
After these options are set to your preferences, click OK to return to your application's print dialogue, then click OK to send your job to ECE-POSTERS1. The printer will automatically form feed and cut once your job has finished printing.


