Difference between revisions of "Use FastX 2"
Jump to navigation
Jump to search
m |
|||
| Line 1: | Line 1: | ||
* Launch the FastX 2 client | * Launch the FastX 2 client | ||
| + | ** Install via SelfService (Macintosh) or Software Center (Windows) on ECE machines or download for personal: | ||
| + | *** Windows: http://www.wolftech.ncsu.edu/files/fastx/fastx-2-0-64-setup_18011.exe | ||
| + | *** Macintosh: http://www.wolftech.ncsu.edu/files/fastx/fastx-2-0-64_18012.dmg | ||
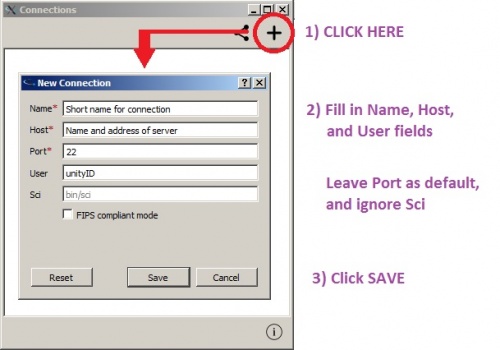
* See the below image for how to create a connection to a server. | * See the below image for how to create a connection to a server. | ||
* Contact ''ecehelp@ncsu.edu'' if you do not know what server to use. | * Contact ''ecehelp@ncsu.edu'' if you do not know what server to use. | ||
Revision as of 21:11, 19 December 2016
- Launch the FastX 2 client
- Install via SelfService (Macintosh) or Software Center (Windows) on ECE machines or download for personal:
- See the below image for how to create a connection to a server.
- Contact ecehelp@ncsu.edu if you do not know what server to use.
- After clicking SAVE, the connection will launch. Enter your Unity password when prompted to finish the connection.
- Double-click an existing connection to launch it.
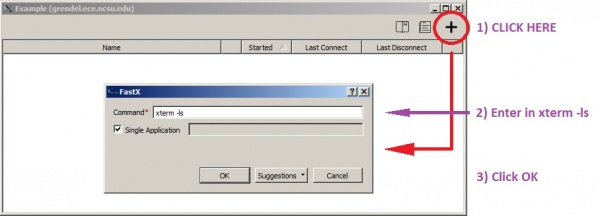
- See the below image for how to open an xterm session.
- NOTE: Wolftech recommends only using xterm sessions. You may use the GNOME or KDE sessions if you wish, but be aware you may experience lag or other issues, especially if you are connecting from off-campus.
- After the xterm launches, use as normal.
- When finished, use 'exit' to close the xterm.
- Close the connection window to end your connection to the server.

