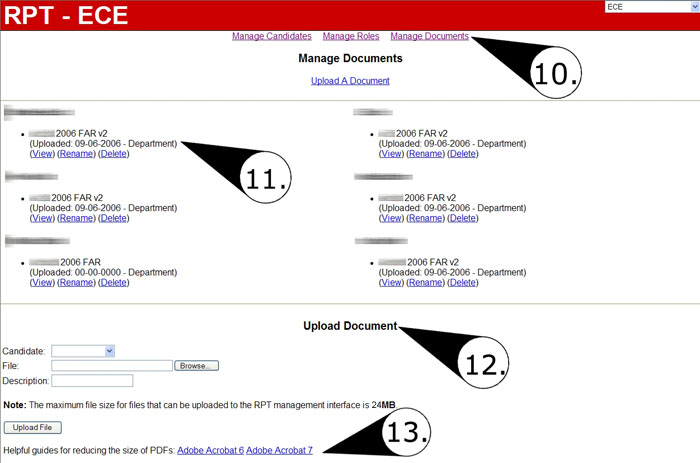
RPT:Document Management

When you first log into http://www.wolftech.ncsu.edu/rpt/ you'll see a dropdown menu (marker #1). "Please Choose An Area" -- in this dropdown, you'll be asked to choose the area you would like to work within.
Please note that you may only have one option to choose from. The page will refresh as soon as you change which area you'd like to view.
After you have selected an area, you should see links at the top of the page. Which links you see will depend upon your access privileges -- those with full access will see the following links:
- "Manage Candidates"
- "Manage Roles"
- "Manage Documents"
Below these links is a list of all the candidates associated with your area.
Click the "Manage Documents" link (marker #10) to bring up the "Manage Documents" page. The first thing you will see is a list of all the candidates in the area. Please note that if you have not already added in your candidate's information, you'll need to do so before uploading documents.
Uploading New Files
To upload a new file for a user, scroll to the bottom of the page, where you will find a simple form (marker #12).
- Choose the Candidate you are uploading the file for from the dropdown menu.
- Choose the file that you wish to upload. To do this, quick the "Browse" button on the line below the dropdown menu. Navigate to the file you wish to upload, select it, and click "Ok".
- Provide a quick description of the file you are uploading.
- Once you have done this, double check all your entries and click the "Upload File" button.
Note: Only Adobe Acrobat (PDF) and Microsoft Word (DOC) documents can be uploaded to the system. Please contact us if you need to allow any other file type for your RPT process.
Barring any problem, your file should be uploaded without incident.
Editing Files
If these users have files already uploaded for them, you will see those files below their names (marker #11). Each file will be listed with the following information:
- the description that was provided for it
- date of the file's upload
- "Department" or "College" -- used to distinguish between candidate documents uploaded by their department or the college RPT committee
- "View" -- clicking this option will load the document for viewing
- "Rename" -- clicking this option will all the user to change the description of the document
- "Delete" -- clicking this option will delete the document. Please note that this CANNOT be undone.
Replacing a File
It is not possible to simply replace a file. You must delete the current one, and upload a new file in its place.
Permissions
Only users with the "Upload" ability have the option to upload documents into RPT Online. To read about changing users' permissions please refer to RPT:User_Management. Currently, the following roles have that ability:
- Department Head / Dean
- RPT Chair
- Uploader
Size Limitations
The webservers maintain a limit of 24MB uploads -- this will prevent any PDF 24MB or larger from being uploaded into the RPT Online system. We have provided instructions (marker #13) on how you may reduce the size of your PDF to meet these restrictions.
